THE STRATEGOGAME FIELD GUIDE
Stratego Best Setup — 8 Openings
The Stratego best setup question has a practical answer: choose a formation whose escape routes, Flag defense and first few moves you understand. There is no proven universal winner. The eight original openings below each contain exactly forty legal pieces, with a full diagram and an honest tradeoff. They are teaching formations, not tournament win-rate claims or copies of somebody else’s named opening.
A protected Flag is useful only if your mobile army can still leave home. Count all forty pieces and trace an open lane before judging a formation by its Bomb pattern.
- Is one of these formations a guaranteed best opening?
The eight formations are original teaching examples, not a ranking supported by tournament win rates. Choose a layout whose Flag defense, mobile exits and first few moves you understand, then test its stated tradeoff in a practice match.
Original guidanceFull explanation ↗- How many pieces does each starting diagram use?
Each diagram contains forty pieces in four home rows: thirty-three mobile soldiers, six Bombs and one Flag. Every formation is checked against the classic inventory and can start a legal match in the local engine.
Stratego best setup checklist: legality before cleverness
Use the four bottom rows only; the two central rows must stay empty. Keep one Flag, six Bombs, eight Scouts, five Miners and the correct officer counts. A symmetric-looking picture is not useful if it quietly adds a seventh Bomb or omits a Miner. Every formation here is generated from the same inventory used by our game engine and checked before its diagram is written.
Next inspect the six central crossing files: A, B, E, F, I and J. Those are the lanes that avoid the lakes. Trace a route from a mobile front piece into the middle, then trace a second route for a reinforcement behind it. Rearranging a back-row officer does little if it remains stuck behind a wall of stationary pieces.
Eight complete starting formations
All diagrams use Red’s viewpoint: A1 is the bottom-left square and row 4 faces the empty middle. F means Flag and B means Bomb. For each layout, the listed first action is an option if the path remains clear, not a promise about your opponent’s reply. Blue can rotate a formation by 180 degrees; do not merely copy Red’s square coordinates onto Blue’s side.
Center pocket
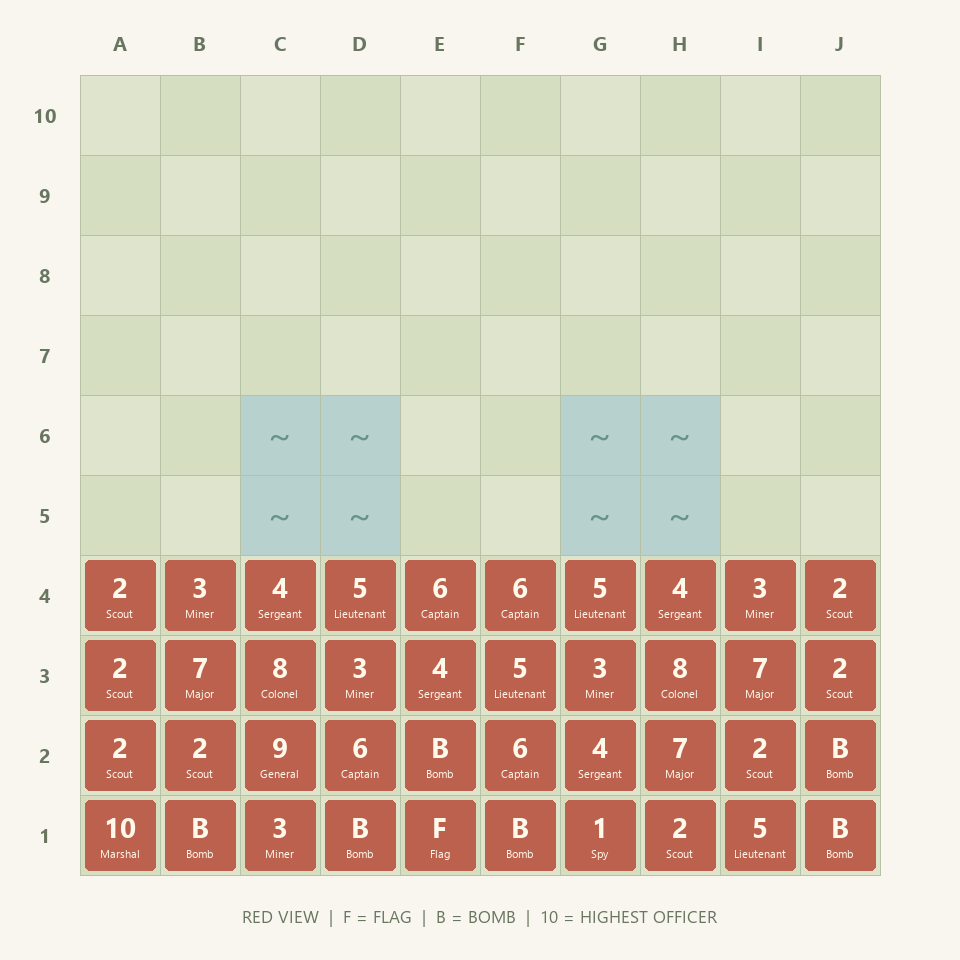
The idea. A central back-row Flag has three adjacent Bomb guards. Scouts and Miners face the open passages, so the army can investigate before its strongest reserve commits.
The tradeoff. Three guards around one pocket are a recognizable signal. The Marshal on A1 also needs several friendly pieces to clear before it can affect the center.
Opening plan. Start by considering Scout A4 to A5. Keep Miner B4 available to follow a discovered Bomb; do not spend every Miner on speculative front-row attacks.
Read all forty squares as text
| Row | A | B | C | D | E | F | G | H | I | J |
|---|---|---|---|---|---|---|---|---|---|---|
| 4 | Scout | Miner | Sergeant | Lieutenant | Captain | Captain | Lieutenant | Sergeant | Miner | Scout |
| 3 | Scout | Major | Colonel | Miner | Sergeant | Lieutenant | Miner | Colonel | Major | Scout |
| 2 | Scout | Scout | General | Captain | Bomb | Captain | Sergeant | Major | Scout | Bomb |
| 1 | Marshal | Bomb | Miner | Bomb | Flag | Bomb | Spy | Scout | Lieutenant | Bomb |
Corner with a relief route
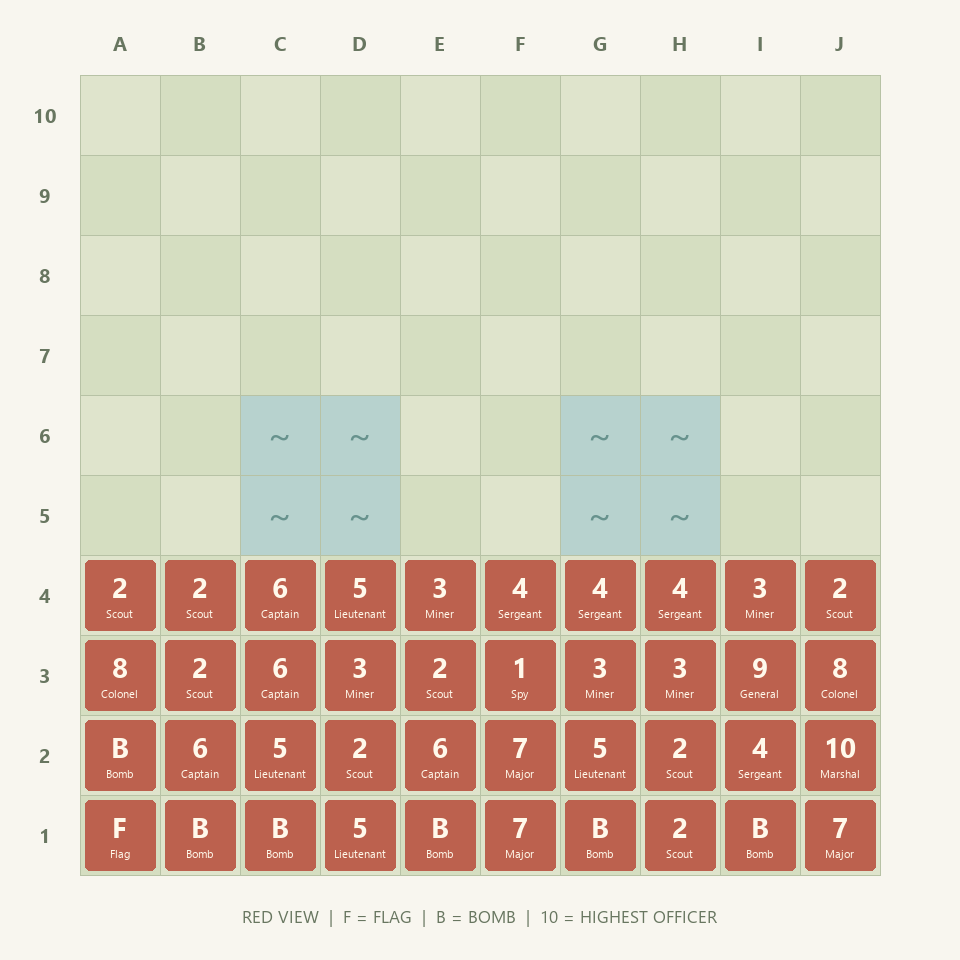
The idea. Two Bombs cover the corner Flag’s adjacent squares. Captain B2 is a mobile reserve rather than a third stationary guard.
The tradeoff. The corner becomes a predictable target once the two guards are found. Captain B2 must get a route through B3; the Bomb on B1 does not offer a retreat.
Opening plan. Consider Scout B4 to B5 to start opening the B-file. Before moving the Captain, check that another friendly piece is not still blocking B3.
Read all forty squares as text
| Row | A | B | C | D | E | F | G | H | I | J |
|---|---|---|---|---|---|---|---|---|---|---|
| 4 | Scout | Scout | Captain | Lieutenant | Miner | Sergeant | Sergeant | Sergeant | Miner | Scout |
| 3 | Colonel | Scout | Captain | Miner | Scout | Spy | Miner | Miner | General | Colonel |
| 2 | Bomb | Captain | Lieutenant | Scout | Captain | Major | Lieutenant | Scout | Sergeant | Marshal |
| 1 | Flag | Bomb | Bomb | Lieutenant | Bomb | Major | Bomb | Scout | Bomb | Major |
Offset right pocket
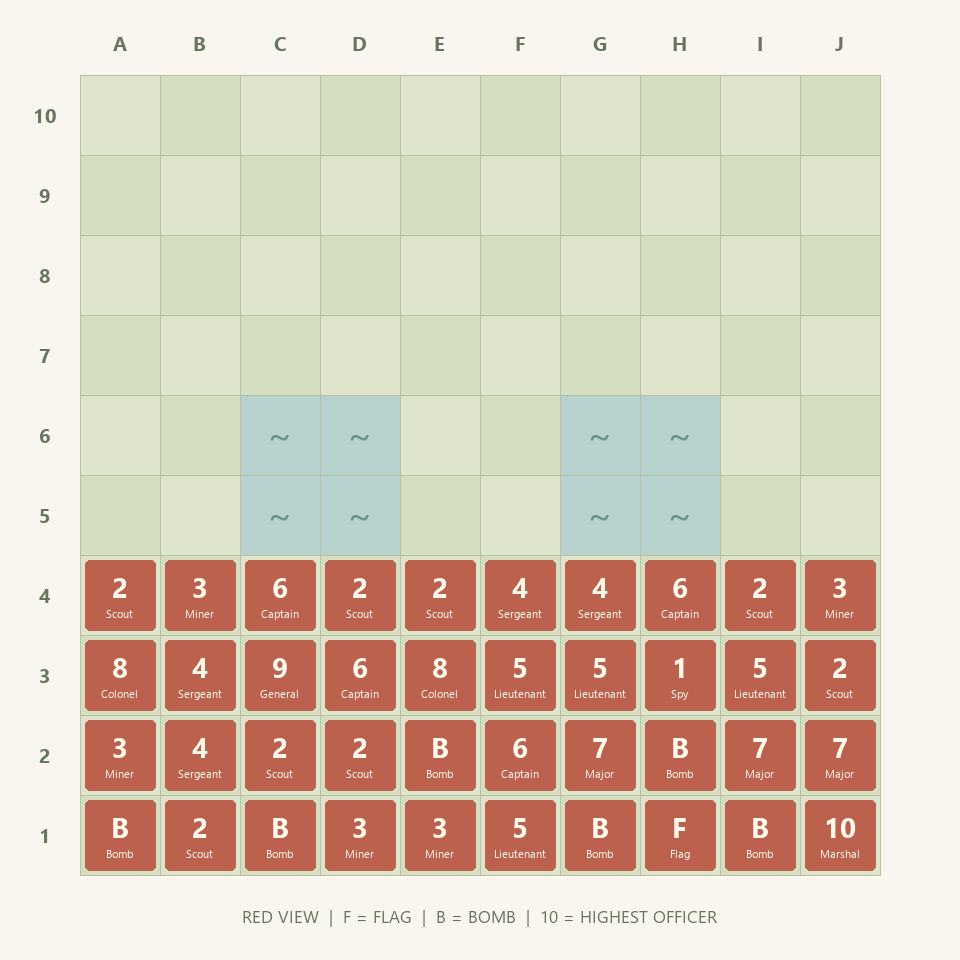
The idea. The Flag sits away from the center and corner, while Major G2 can reinforce a threatened route if friendly traffic clears.
The tradeoff. The H2 guard blocks a direct forward exit from the Flag area. Shifting all mobile defenders left would leave a long journey back to the right flank.
Opening plan. Consider Scout I4 to I5 for information on the nearest open passage. Keep Major G2’s route toward G3 and H3 in mind before committing it elsewhere.
Read all forty squares as text
| Row | A | B | C | D | E | F | G | H | I | J |
|---|---|---|---|---|---|---|---|---|---|---|
| 4 | Scout | Miner | Captain | Scout | Scout | Sergeant | Sergeant | Captain | Scout | Miner |
| 3 | Colonel | Sergeant | General | Captain | Colonel | Lieutenant | Lieutenant | Spy | Lieutenant | Scout |
| 2 | Miner | Sergeant | Scout | Scout | Bomb | Captain | Major | Bomb | Major | Major |
| 1 | Bomb | Scout | Bomb | Miner | Miner | Lieutenant | Bomb | Flag | Bomb | Marshal |
Two similar signals
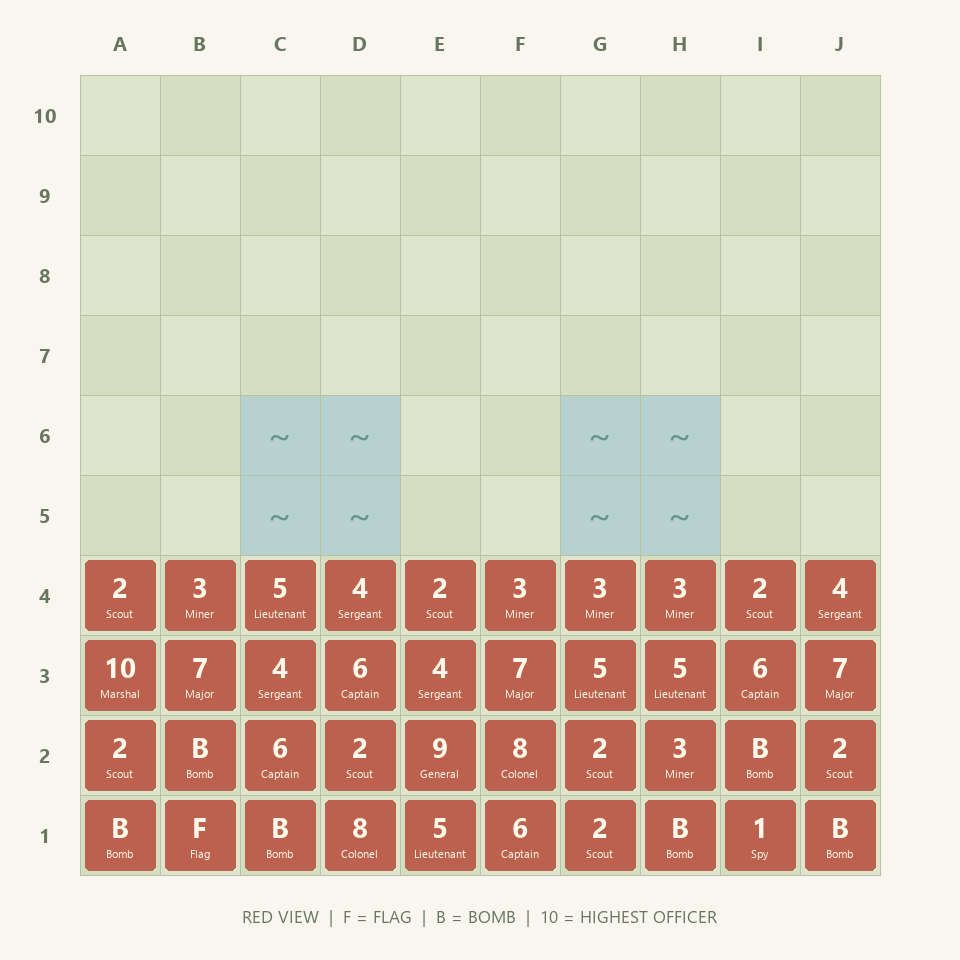
The idea. The true B1 pocket and a similar I1 pocket present two stationary-looking clusters. I1 holds the Spy, not a second Flag.
The tradeoff. All six Bombs support two compact clusters, leaving fewer isolated obstacles elsewhere. The decoy Spy can become trapped or wasted if the opponent does not investigate it.
Opening plan. Consider Scout E4 to E5 to contest the middle without immediately showing which flank matters. Preserve Captain C2 as a defender near the genuine pocket.
Read all forty squares as text
| Row | A | B | C | D | E | F | G | H | I | J |
|---|---|---|---|---|---|---|---|---|---|---|
| 4 | Scout | Miner | Lieutenant | Sergeant | Scout | Miner | Miner | Miner | Scout | Sergeant |
| 3 | Marshal | Major | Sergeant | Captain | Sergeant | Major | Lieutenant | Lieutenant | Captain | Major |
| 2 | Scout | Bomb | Captain | Scout | General | Colonel | Scout | Miner | Bomb | Scout |
| 1 | Bomb | Flag | Bomb | Colonel | Lieutenant | Captain | Scout | Bomb | Spy | Bomb |
Mobile Flag neighborhood
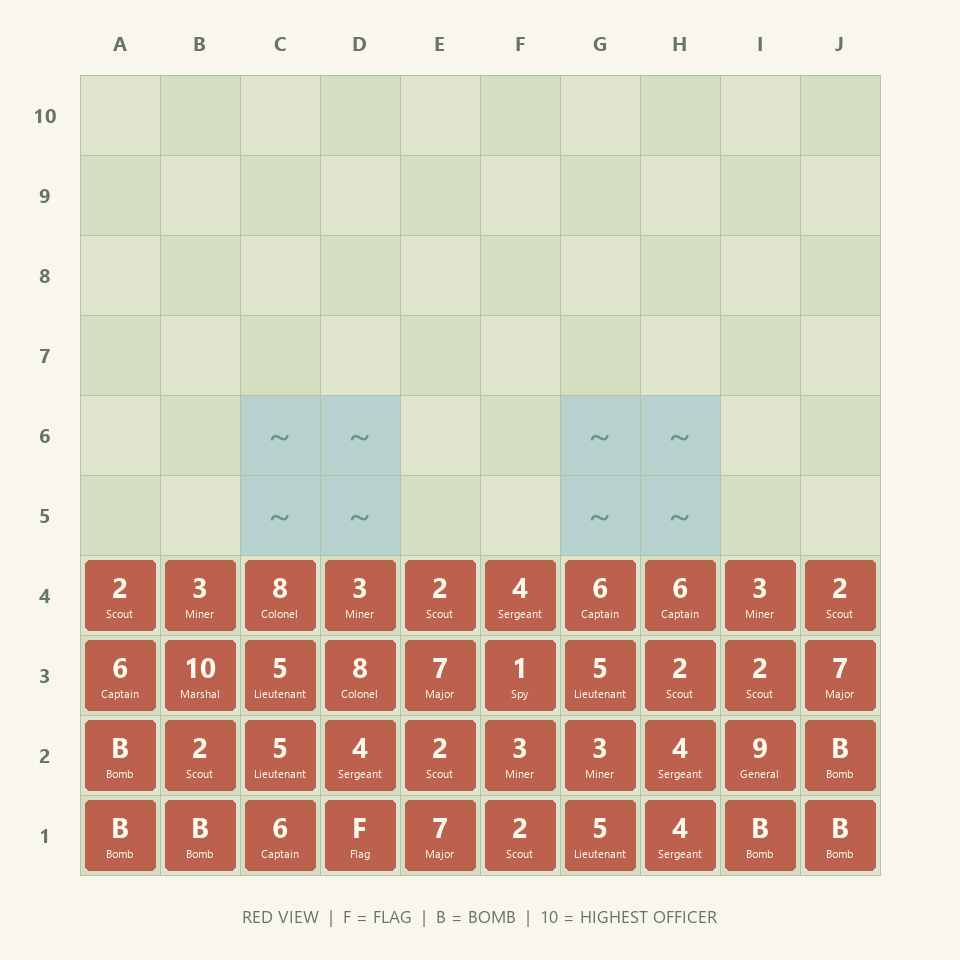
The idea. The Flag has mobile neighbors instead of adjacent Bombs. This demonstrates a less obvious pocket and makes local piece traffic important.
The tradeoff. There is no stationary shield on the three adjacent home squares. Moving C1, E1 and D2 away together would expose the Flag to a legal intruder.
Opening plan. Consider Scout E4 to E5, then evaluate the opponent’s approach before moving your D2 defender. This is a teaching example of active defense, not the safest first choice.
Read all forty squares as text
| Row | A | B | C | D | E | F | G | H | I | J |
|---|---|---|---|---|---|---|---|---|---|---|
| 4 | Scout | Miner | Colonel | Miner | Scout | Sergeant | Captain | Captain | Miner | Scout |
| 3 | Captain | Marshal | Lieutenant | Colonel | Major | Spy | Lieutenant | Scout | Scout | Major |
| 2 | Bomb | Scout | Lieutenant | Sergeant | Scout | Miner | Miner | Sergeant | General | Bomb |
| 1 | Bomb | Bomb | Captain | Flag | Major | Scout | Lieutenant | Sergeant | Bomb | Bomb |
Reserved Miner routes
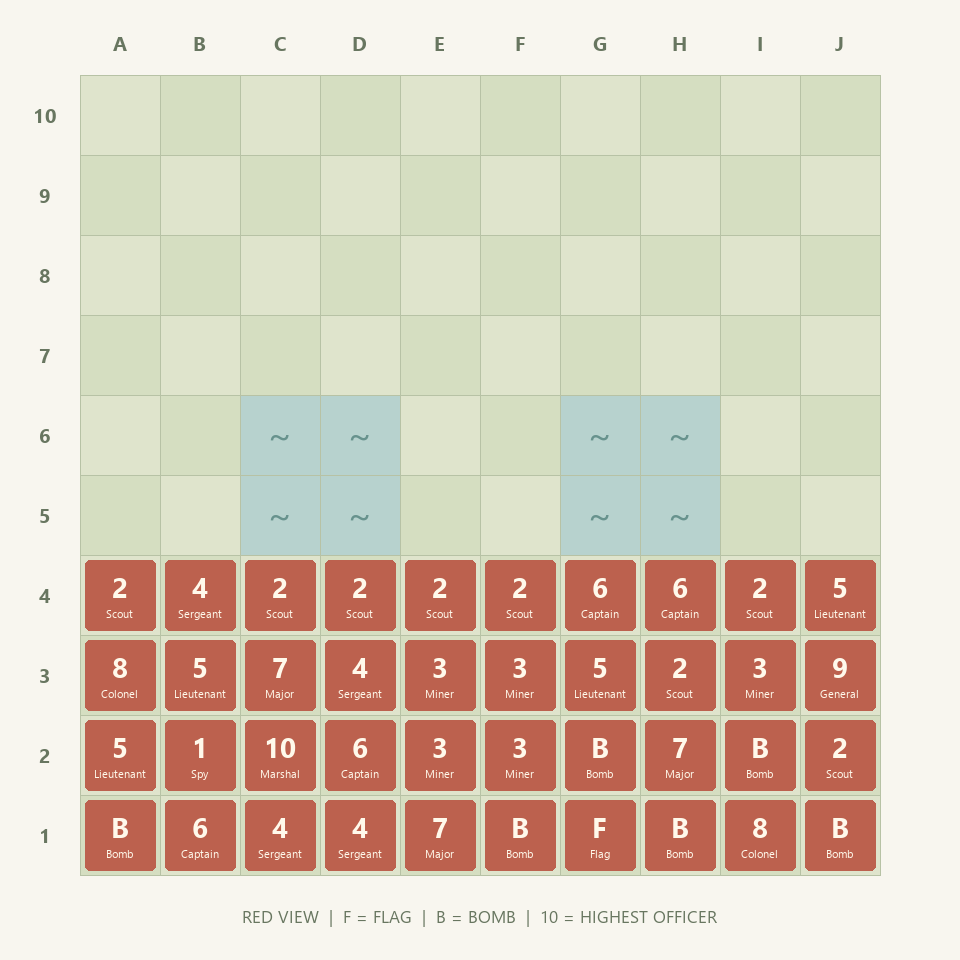
The idea. All five Miners begin behind the front rank, near the middle or right-side passages. The point is to keep a Bomb-breaking option for a later attack.
The tradeoff. Holding every Miner back can slow the first attempt to clear a confirmed front-line Bomb. Friendly soldiers must clear routes from E3, F3 and I3.
Opening plan. Consider Scout F4 to F5. A Miner can follow after that lane is understood; do not move it solely because its square sits behind a Scout.
Read all forty squares as text
| Row | A | B | C | D | E | F | G | H | I | J |
|---|---|---|---|---|---|---|---|---|---|---|
| 4 | Scout | Sergeant | Scout | Scout | Scout | Scout | Captain | Captain | Scout | Lieutenant |
| 3 | Colonel | Lieutenant | Major | Sergeant | Miner | Miner | Lieutenant | Scout | Miner | General |
| 2 | Lieutenant | Spy | Marshal | Captain | Miner | Miner | Bomb | Major | Bomb | Scout |
| 1 | Bomb | Captain | Sergeant | Sergeant | Major | Bomb | Flag | Bomb | Colonel | Bomb |
Left-lane investigation
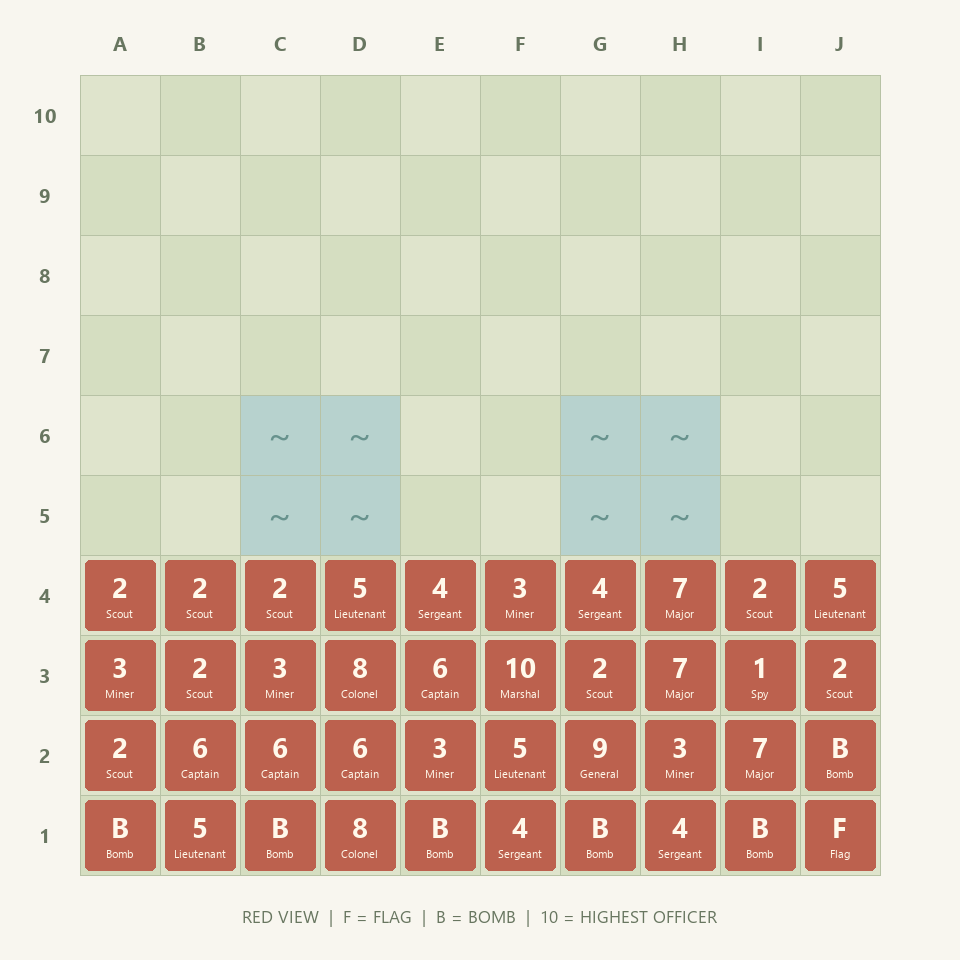
The idea. Two Scouts lead the left passage with a Miner behind them. The opposite-corner Flag keeps the first investigation separate from the most sensitive pocket.
The tradeoff. A visible left-side commitment can invite a faster attack on the right. Major I2 is a reserve with a job; sending it left too soon removes that counterweight.
Opening plan. Consider Scout A4 to A5. Open a route for Miner A3 only after learning what blocks the passage, and keep watching the I-file near your own Flag.
Read all forty squares as text
| Row | A | B | C | D | E | F | G | H | I | J |
|---|---|---|---|---|---|---|---|---|---|---|
| 4 | Scout | Scout | Scout | Lieutenant | Sergeant | Miner | Sergeant | Major | Scout | Lieutenant |
| 3 | Miner | Scout | Miner | Colonel | Captain | Marshal | Scout | Major | Spy | Scout |
| 2 | Scout | Captain | Captain | Captain | Miner | Lieutenant | General | Miner | Major | Bomb |
| 1 | Bomb | Lieutenant | Bomb | Colonel | Bomb | Sergeant | Bomb | Sergeant | Bomb | Flag |
Split mobile reserves
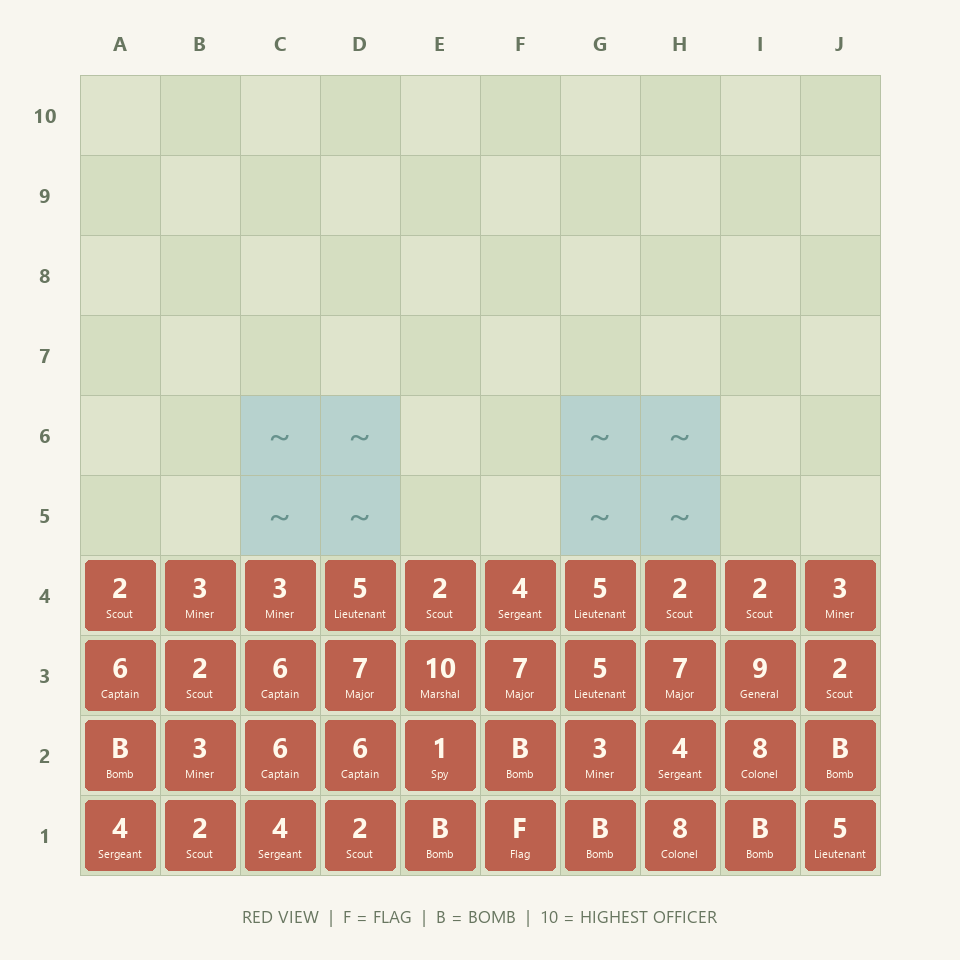
The idea. The Marshal begins behind the central passage and the General behind the right passage. Their starting positions offer two different reinforcement plans.
The tradeoff. Two valuable reserves are still two blocked pieces until the front clears. The Spy on E2 is useful only if it can create an attacking encounter, not merely stand near the Marshal.
Opening plan. Consider Scout E4 to E5 to prepare central access. Do not advance both strong reserves just to reveal more unknown front pieces.
Read all forty squares as text
| Row | A | B | C | D | E | F | G | H | I | J |
|---|---|---|---|---|---|---|---|---|---|---|
| 4 | Scout | Miner | Miner | Lieutenant | Scout | Sergeant | Lieutenant | Scout | Scout | Miner |
| 3 | Captain | Scout | Captain | Major | Marshal | Major | Lieutenant | Major | General | Scout |
| 2 | Bomb | Miner | Captain | Captain | Spy | Bomb | Miner | Sergeant | Colonel | Bomb |
| 1 | Sergeant | Scout | Sergeant | Scout | Bomb | Flag | Bomb | Colonel | Bomb | Lieutenant |
Why the classic corner Flag can lose
A corner needs only two adjacent Bombs to block direct approaches, compared with three around a back-edge interior Flag. That saves a Bomb, but it also concentrates the destination in a place an opponent can test systematically. Once a surviving Miner reaches the correct approach, stationary guards cannot chase it away. A defender must arrive before the corridor is lost.
The danger is not that the corner is inherently illegal or always bad. It is confusing a compact shield with a complete defense. In opening two, ask whether your mobile defender can reach B2 without being blocked by your own pieces. If not, exchange a rear officer with a piece on that route before you start. Use a fresh variation against someone who has already seen your arrangement.
Adapt a layout without breaking its purpose
Change a pocket as a group: moving the Flag from E1 to F1 without moving its guards may turn a protected pattern into an exposed one. Then recheck legal inventory and exits. Exchanging two mobile pieces preserves the count, but changing their identities independently can accidentally create an extra General or a missing Spy.
Judge changes by the question you want to test. Does one reserved Miner survive until the enemy Bombs are located? Can a strong officer enter the middle without announcing your Flag’s neighborhood? Can a Scout probe one side while the other side still has a retreat? Our diagrams let you inspect those questions; they cannot tell you what a hidden opponent will play.
- Keep at least one useful mobile route out of each defended pocket.
- Do not spend all Miners testing the first unknown front-row soldiers.
- Avoid repeating an identical Flag pattern against a player who remembers it.
- After a practice game, change one idea at a time so you can explain the effect.
Use these examples in the local preview
The homepage’s Use starter button loads the center-pocket example. For the other seven, open the formation editor and reproduce the diagram manually, or begin with a shuffle and exchange pieces until the coordinates match. Each diagram includes a text inventory of its forty squares, so the formation is accessible even if an image fails to load.
This release does not save templates to an account or apply every diagram with a one-click import. When those controls are added, the same validated rank arrays can power them without changing the rules engine. For now, choose one formation, play a complete practice game, and take its concrete opening plan into the strategy guide.
Sources and edition notes
The rule facts below were checked against these references. The examples, formations, diagrams, video and printable explanation on this site were written for this guide.
- Jumbo: Original / 65th Anniversary rules ↗Classic forty-piece army, movement, battles and the optional Battle Cards edition. Our examples are independently written.
A complete match teaches more than memorizing every hidden possibility.
Go to the board →