THE STRATEGOGAME FIELD GUIDE
Stratego Rules — Every Rule Explained
Stratego rules turn a hidden army into a game of deduction: arrange forty pieces, move one soldier on your turn, and capture the opposing Flag. This reference explains the classic forty-piece format with Marshal 10 as the strongest officer. Worked decisions below separate ordinary rules, edition differences and the local preview’s house rule, so a remembered rule from another box does not quietly change your match.
Higher numbered officers usually win. Miners remove Bombs; an attacking Spy defeats the Marshal. A Bomb is not consumed by an ordinary attack.
- Does a Bomb disappear after an ordinary attack?
In the forty-piece format used here, a Bomb survives an attack by any non-Miner. Remove the attacking soldier and leave the Bomb in place. An attacking Miner removes the Bomb and occupies its square.
- Does repeating a position automatically mean a draw?
The local preview declares a draw after three identical board positions with the same side to move. This is a house rule, separate from the two-square movement restriction. Having no legal move is a loss.
Local previewFull explanation ↗
Stratego rules: the board and objective
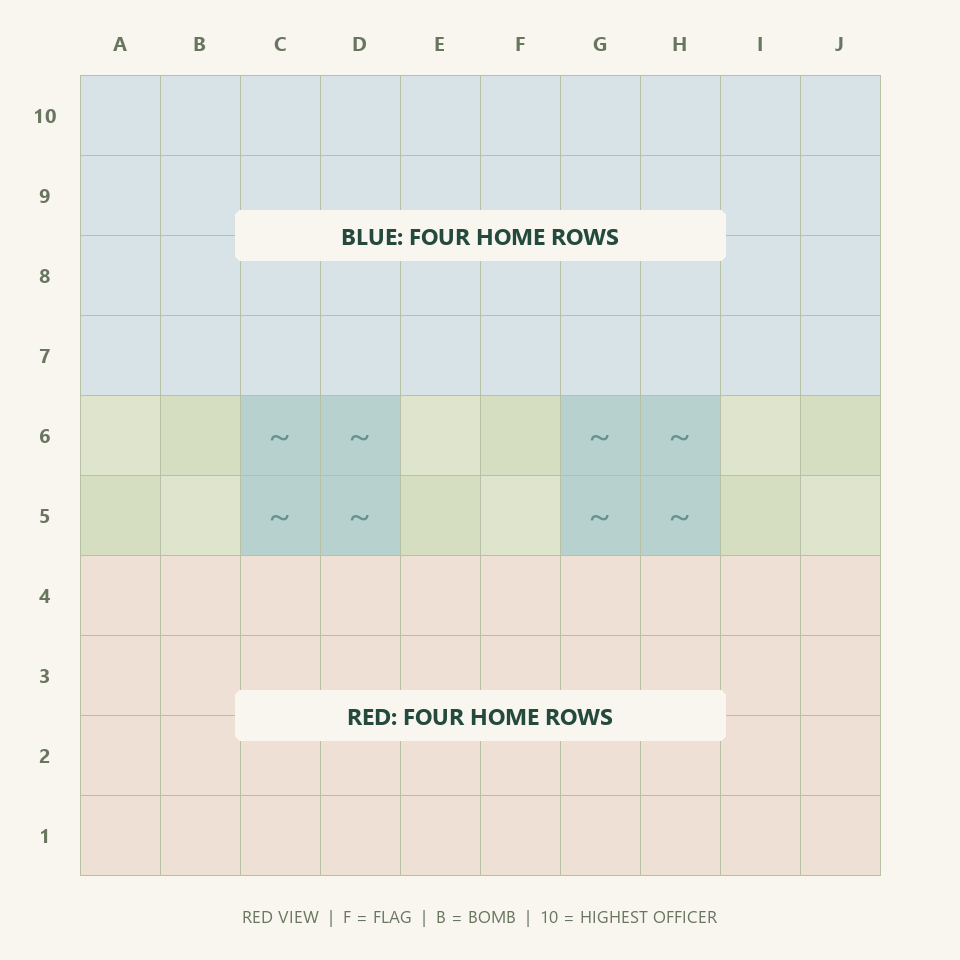
Two players command red and blue armies on a ten-by-ten board. Two lakes occupy eight central squares, leaving ninety-two usable squares. Capture the enemy Flag to win; eliminating every enemy piece is unnecessary. A player who has no legal move on their turn also loses, even if their Flag is still safe.
Each player privately fills the four rows nearest them with forty pieces, one per square. The two central rows start empty. After both arrangements are complete, Red begins. You may rearrange your own pieces before confirming setup; during play the Flag and Bombs remain where they began. This page is the rule reference; the beginner guide shows the order of actions in an actual first game.
The forty pieces and rank table
An army contains thirty-three movable soldiers, six stationary Bombs and one stationary Flag. The twelve names in the table are piece types, not twelve pieces. The number printed on an officer is a combat rank, not a movement allowance: a General marked 9 still moves one square.
Some older sets give the Marshal number 1 and the Scout number 9. In those sets a smaller printed number can mean a stronger officer. Match names to names before playing; never combine one set’s comparison direction with another set’s numbers. Additional figures supplied as alternate artwork or optional specialist pieces do not increase the classic starting army above forty.
| Piece | Modern rank | Count | Move |
|---|---|---|---|
| Marshal | 10 | 1 | One orthogonal square |
| General | 9 | 1 | One orthogonal square |
| Colonel | 8 | 2 | One orthogonal square |
| Major | 7 | 3 | One orthogonal square |
| Captain | 6 | 4 | One orthogonal square |
| Lieutenant | 5 | 4 | One orthogonal square |
| Sergeant | 4 | 4 | One orthogonal square |
| Miner | 3 | 5 | One orthogonal square |
| Scout | 2 | 8 | Any clear straight distance |
| Spy | 1 | 1 | One orthogonal square |
| Bomb | — | 6 | None |
| Flag | — | 1 | None |
| Total | 12 types | 40 | 33 mobile soldiers |
How to move and how to attack
Take one turn by moving one eligible piece or making one attack. Ordinary soldiers travel one square horizontally or vertically. Diagonal moves, jumps, movement through occupied squares and entering either lake are illegal. A friendly piece blocks its square; it is never a target you can capture to clear a route. You cannot pass merely because you prefer not to move.
A Scout may travel along any clear row or column and may attack an enemy at the end of that line. It cannot turn a corner or pass through a piece or lake. For example, a Scout on A4 can attack an enemy on A7 if A5 and A6 are empty. A Scout on C4 cannot run through C5 and C6: those squares are water.
An attack finishes the turn. Both participants reveal their identities for resolution. A winning attacker occupies the defender’s square; a winning defender stays in place. Equal ordinary ranks remove both pieces and leave the destination empty. You do not capture an officer and then use that same turn to make another move.
Bomb, Spy and Flag exceptions
A Bomb defeats every attacking soldier except a Miner. When a Captain attacks a Bomb, remove the Captain and leave the Bomb on its original square. When a Miner attacks a Bomb, remove the Bomb and move the Miner onto that square. This is not a rule where a mine explodes and automatically removes both participants.
The Spy defeats the Marshal only when the Spy is the attacker. Reverse the direction and the Marshal wins. A Spy attacking another Spy produces an equal-rank exchange, so both leave. Every other ordinary soldier beats the Spy in a direct fight. The Spy’s special case does not let it defeat a Bomb, a General or a Colonel.
Any movable soldier can capture an enemy Flag by making a legal attack onto it. Stop immediately when that happens. Flags and Bombs cannot attack, swap places or move out of danger after setup. Their marks are special identities, not ordinary combat ranks above the Marshal.
| Attacker | Defender | Decision |
|---|---|---|
| Captain 6 | Bomb | Captain removed; Bomb stays |
| Miner 3 | Bomb | Bomb removed; Miner occupies its square |
| Spy 1 | Marshal 10 | Spy wins because it attacks |
| Marshal 10 | Spy 1 | Marshal wins |
| Colonel 8 | Colonel 8 | Both removed |
| Scout 2 | Flag | Flag captured; game ends |
Common disputed cases, resolved
A revealed Bomb is still a Bomb. Learning its identity changes what you know, not whether it may move or survive the next attack. Likewise, an opponent’s soldier that has moved cannot later be treated as an unknown Bomb or Flag. Keep track of the physical piece, rather than attaching the remembered rank permanently to a square it has left.
The published classic rule restricts repeated back-and-forth movement between the same two squares. In this preview, crossings A4→A5, A5→A4 and A4→A5 are allowed for that same piece on its successive turns; a fourth immediate return is blocked. This is a movement restriction, not permission to declare a draw as soon as somebody retreats.
A draw is not the same as having no legal move. The latter is a loss. The classic leaflet used here does not establish a universal threefold-position draw. Our local preview does end a match when the same complete position, including the side to move, appears three times: that is explicitly a house rule. Tournament pursuit rules, clocks and adjudication can add further conditions; agree on them before a competitive match.
In this preview enemy faces turn hidden again after combat, while the public log records the encounter. A surviving identity remains information you may remember. A long Scout move also identifies its type. An online interface that keeps a face visible is a display choice; it does not create a different winner in the underlying battle.
Download the printable Stratego rules PDF
The free PDF below is our independently written, three-page table reference: inventory and setup, movement and combat, then disputed cases and edition notes. It uses the same numbering and examples as this page. Print it for a shared table or keep it beside the browser; no email, account or purchase is required.
This is an unofficial explanation, not a scan of a publisher’s booklet. For the exact wording for your physical edition, use its own leaflet or the publisher sources below. To choose a formation next, continue to the setup guide; for decisions after the opening, use the strategy guide.
3 pages · PDF · Original explanation, with edition and house-rule notes.
Download free rules PDFOpen PDF in a new tab ↗Sources and edition notes
The rule facts below were checked against these references. The examples, formations, diagrams, video and printable explanation on this site were written for this guide.
- Jumbo: Original / 65th Anniversary rules ↗Classic forty-piece army, movement, battles and the optional Battle Cards edition. Our examples are independently written.
- PlayMonster: Stratego Original rules ↗Publisher reference for Original and its edition-specific additions. Extra box contents are not automatically part of a classic army.
- Strategus: both rank-number systems ↗A useful name-by-name comparison of the older and newer numbering directions.
A complete match teaches more than memorizing every hidden possibility.
Go to the board →